# Call Telemetry Cluster and High Availability Deployment Guide
This guide provides detailed instructions for setting up and deploying the Call Telemetry application using Kuberenetes with load balancing an a HA PostgreSQL Cluster.
Kubernetes Clustering is free to use on your own, with paid support is available please context Support for more information.
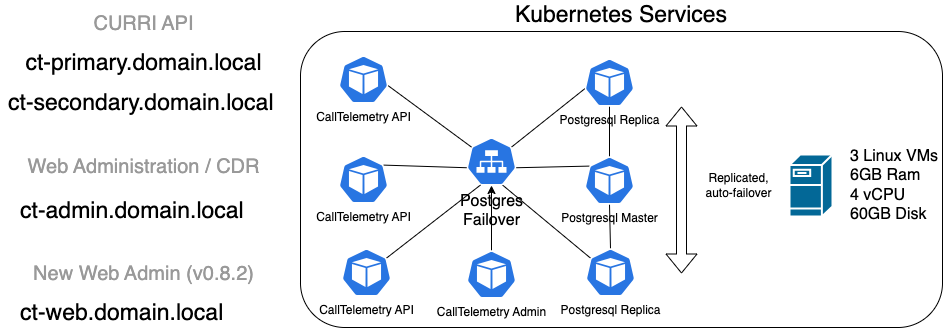
# Architecture
# Prerequisites
Before beginning the installation, ensure you have the following requirements. A 3 node cluster will need 7 IP Addresses on the same subnet to complete the install.
- Node IPs: Multiple nodes as typically installed for a highly available cluster. 3 nodes are recommended for a production environment. These are standard IP addresses for the OS.
- Primary Virtual IP: The Virtual IP address of the Primary CURRI API service.
- Secondary Virtual IP: The Virtual IP address of the Secondary CURRI API service.
- Admin Virtual IP: The Virtual IP address used by the Call Telemetry Management API.
- Management Virtual IP: The Virtual IP addresses used for the Call Telemetry Management Web Page.
- K3S Token: A pre-shared key among K3s nodes for authentication. You can set it now, or get it post-install from the primary node with
sudo cat /var/lib/rancher/k3s/server/node-token.
# Installation Steps
# OS Preparation
This step configures the firewall, and installs some tools needed for managing Kubernetes.
# Supported OS Versions
- AlmaLinux 9.x
- RHEL 9.x
- CentOS Stream 9.x
# Disable Firewall and selinux
sudo systemctl stop firewalld
sudo systemctl disable firewalld
sudo setenforce permissive
sudo systemctl disable rpcbind

# Install Kubectl and Helm via SNAPS
sudo yum install -y wget epel-release
sudo yum install -y snapd
sudo systemctl enable --now snapd.socket
sudo ln -s /var/lib/snapd/snap /snap
sudo snap wait system seed.loaded
sudo systemctl restart snapd.seeded.service
sudo snap install kubectl --classic
sudo snap install helm --classic

# Install K9s Kubernetes Management tool
echo "Installing k9s toolkit - https://github.com/derailed/k9s/"
wget https://github.com/derailed/k9s/releases/download/v0.32.5/k9s_Linux_x86_64.tar.gz
tar -xzf k9s_Linux_x86_64.tar.gz
sudo mv k9s /usr/local/bin
mkdir ~/.k9s
rm -rf k9s*

# Install GIT
sudo dnf install -y git
# K3s Installation
K3s is a lightweight Kubernetes distribution designed for easy installation and operation of Kuberenetes.
# Setting Up the Primary Node
Install K3s Install K3s on the primary node. Note the token value, which is hashed into the shared cluster secret value.
# From Primary Node.
export K3S_TOKEN="calltelemetry"
curl -sfL https://get.k3s.io | K3S_KUBECONFIG_MODE=0644 sh -s server --cluster-init --disable traefik --disable servicelb
This command initializes the K3s server, disables Traefik (a default ingress controller), and the default service load balancer.
Configure Kubectl Set up
kubectl, the command-line tool for interacting with the Kubernetes cluster:# From Primary node. mkdir -p ~/.kube sudo cat /etc/rancher/k3s/k3s.yaml > ~/.kube/config
# Optionally Setting Up Secondary Nodes
3 Nodes is typical for a Kubenretes cluster, but you can skip this step and just run a single node.
Install K3s on Secondary Nodes Join secondary nodes to the K3s cluster. Note the token value, and the primary node IP address.
# From the secondary node to be installed.
export primary_ip="192.168.123.156"
export K3S_TOKEN="calltelemetry"
sudo curl -sfL https://get.k3s.io | K3S_URL="https://$primary_ip:6443" K3S_KUBECONFIG_MODE=0644 sh -s server --disable traefik --disable servicelb
mkdir -p ~/.kube
sudo cat /etc/rancher/k3s/k3s.yaml > ~/.kube/config
Checking Nodes
# From any node.
[calltelemetry@ct-node-1 ~]$ kubectl get node
NAME        STATUS   ROLES                       AGE   VERSION
ct-node-1   Ready    control-plane,etcd,master   34h   v1.29.6+k3s2
ct-node-2   Ready    control-plane,etcd,master   33h   v1.29.6+k3s2
ct-node-3   Ready    control-plane,etcd,master   34h   v1.29.6+k3s2
[calltelemetry@ct-node-1 ~]$
Scale DNS Pods Adjust DNS pod replicas to match the number of total nodes. This helps with failover.
# From any node.
kubectl scale deployment.v1.apps/coredns --replicas=3 -n kube-system
Check DNS Pod Scale
# From any node.
[calltelemetry@ct-node-1 ~]$ kubectl get pods -A | grep dns
kube-system         coredns-6799fbcd5-2v68f                  1/1     Running     0                   13m
kube-system         coredns-6799fbcd5-55mdh                  1/1     Running     0                   13m
kube-system         coredns-6799fbcd5-6skkc                  1/1     Running     2 (<invalid> ago)   34h
[calltelemetry@ct-node-1 ~]$
# MetalLB Installation for Load Balancing
MetalLB is a load balancer implementation for bare metal Kubernetes clusters, enabling external access to services.
Install MetalLB Using Helm Helm is a package manager for Kubernetes, and it simplifies the deployment of applications:
# From Primary node.
kubectl create namespace metallb-system
helm repo add metallb https://metallb.github.io/metallb
helm install -n metallb-system metallb metallb/metallb
# CrunchyData PostgreSQL Operator Installation
The CrunchyData PostgreSQL Operator automates PostgreSQL database cluster deployment, management, and monitoring in Kubernetes.
Install PostgreSQL Operator and CRDs
# From Primary node.
kubectl create namespace postgres-operator
git clone https://github.com/CrunchyData/postgres-operator-examples.git
kubectl apply --server-side -k postgres-operator-examples/kustomize/install/default
Create CT PostgreSQL Database Cluster
# From Primary node.
kubectl create namespace ct
kubectl apply -n ct -f calltelemetry/kuberentes/postgres/ct-postgres.yaml
# Call Telemetry Application Deployment
Add Call Telemetry Helm Repository
# From Primary node.
helm repo add ct_charts https://storage.googleapis.com/ct_charts/
helm repo update
Create Custom Configuration File Customize deployment parameters such as hostname and IPs:
# From Primary node.
cat <<EOF > ./ct_prod.yaml
hostname: calltelemetry.local
environment: prod
primary_ip: 192.168.123.203
secondary_ip: 192.168.123.204
cluster_ip_start: 192.168.123.205
cluster_ip_end: 192.168.123.205
admin_ip: 192.168.123.206
management_ip: 192.168.123.207
EOF
Deploy Using Helm Helm is used to deploy the application with the specified configuration. The release name is ct, the namespace is ct.
# From primary node.
helm install -n ct ct ct_charts/stable-ha -f ./ct_prod.yaml
# Upgrading the Application
To upgrade the Call Telemetry application, use:
# From Primary node.
helm upgrade -n ct ct ct_charts/stable-ha -f ./ct_prod.yaml
# Troubleshooting
# Uninstall K3s
To uninstall K3s, use:
# Node to be uninstalled.
/usr/local/bin/k3s-uninstall.sh